Setting the time on a digital watch is typically a straightforward process. While specific instructions may vary depending on the brand and model of the watch, here’s a general guide on how to set the time on a digital watch:
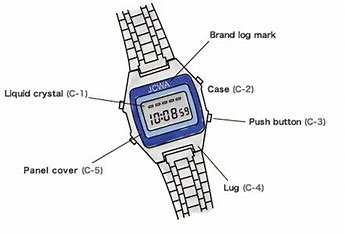
Locate the Watch Buttons:
Look for the buttons on your watch. Usually, there are typically four buttons labeled as “Mode,” “Set,” “Start/Stop,” and “Light.” These buttons may vary in placement and labeling, so refer to your watch’s user manual for precise instructions.
Enter Time Setting Mode:
Press the “Mode” button to enter the time setting mode. Some watches may require you to press and hold the “Mode” button for a few seconds to activate this mode.
Select the Correct Function:
Once in the time setting mode, you’ll need to select the time setting function. This is usually done by repeatedly pressing the “Mode” button until the time setting function is highlighted. On some watches, the function may be labeled as “Time” or “T.”
Adjust the Hours:
After selecting the time setting function, the hours will typically start flashing or blinking on the display. Use the “Set” button or the “+” and “-” buttons to adjust the hours. Pressing the “Set” button should advance the hours, while the “+” and “-” buttons may increase or decrease the hours.
Move to Minutes Setting:
Once you have set the correct hours, press the “Set” button or the “Mode” button to move to the minutes setting. The minutes should start flashing or blinking.
Adjust the Minutes:
Similar to adjusting the hours, use the “Set” button or the “+” and “-” buttons to adjust the minutes. Press the “Set” button to advance the minutes or use the “+” and “-” buttons to increase or decrease the minutes.
Confirm and Exit:
Once you have set the correct time, press the “Set” button or the “Mode” button to confirm and exit the time setting mode. The watch should now display the updated time.
Set AM or PM (if applicable):
Some digital watches use a 12-hour format and require you to set whether it is AM or PM. If your watch displays the time in this format, there may be an indicator or option to set the appropriate AM or PM. Use the “Set” or arrow buttons to toggle between AM and PM, and press the “Set” or “Mode” button to confirm your selection.
Set Additional Time Functions (if applicable):
Depending on the features of your digital watch, there may be additional time-related functions you can set, such as dual time, alarms, or timers. To access these functions, use the “Mode” button to cycle through the available options and the “Set” button to adjust the settings as needed. Refer to your watch’s user manual for specific instructions on setting these functions.
Activate the Time Display:
Once you have set the time and any additional functions, press the “Mode” button to exit the time setting mode and return to the normal watch display. The watch should now show the current time according to your settings.
Regularly Check and Adjust:
Digital watches typically have a quartz movement that keeps time accurate, but it’s always a good idea to periodically check the accuracy of your watch against a reliable time source. If necessary, you can make small adjustments by repeating the time-setting process.
Remember, these steps are meant to provide general guidance for setting the time on a digital watch. The specific instructions may differ depending on the brand and model of your watch. Consulting your watch’s user manual is always recommended for the most accurate and detailed instructions.